Identifying Common Issues with Pfister Bathroom Faucets
Pfister bathroom faucets are known for their quality and durability. However, like any plumbing fixture, they can develop issues over time. Here are some of the common problems that you may encounter with your Pfister bathroom faucet and how to identify them.
- Leaking Faucet: One of the most common issues with Pfister bathroom faucets is a leaking faucet. This can be caused by a worn-out O-ring, a loose connection, or a damaged valve. To identify a leaking faucet, check for water dripping from the spout or handle. You may also notice water pooling around the base of the faucet.
- Low Water Pressure: Another common issue is low water pressure. If you notice a weak stream of water coming out of the faucet, it could be due to mineral buildup in the aerator or a clogged cartridge. To check for low water pressure, turn on both the hot and cold water and observe the flow.
- Erratic Temperature Control: If you find that your Pfister bathroom faucet is not maintaining a consistent water temperature, it could be due to a faulty mixing valve or a worn-out cartridge. This can result in sudden changes in water temperature, making it uncomfortable to use the faucet.
- Noisy Faucet: A noisy faucet can be quite annoying. If you hear rattling or banging noises when you turn on the water, it could be due to loose parts or a faulty cartridge. Check for any loose connections or worn-out components that may be causing the noise.
- Handle Difficulties: Sometimes, you may face difficulties in turning the handle of your Pfister bathroom faucet. This can be caused by a loose handle, a damaged cartridge, or mineral buildup. If you experience resistance or a loose handle, it’s important to address the issue promptly to avoid further damage.
Troubleshooting Steps for Leaking Pfister Bathroom Faucets
Dealing with a leaking Pfister bathroom faucet can be frustrating. However, before calling a plumber, there are some troubleshooting steps you can take to identify and fix the issue. We will guide you through the process of troubleshooting a leaking Pfister bathroom faucet.
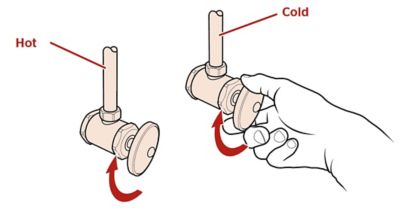
- Turn Off the Water Supply: The first step in troubleshooting a leaking Pfister bathroom faucet is to turn off the water supply. Locate the shut-off valves under the sink and close them to prevent any further water leakage.
- Inspect the O-Ring: A common cause of a leaking faucet is a worn-out O-ring. Remove the handle of the faucet to access the cartridge. Inspect the O-ring for any signs of wear or damage. If necessary, replace the O-ring with a new one.
- Check the Cartridge: The cartridge is responsible for controlling the flow of water in the faucet. A faulty cartridge can cause leaks. Remove the cartridge and inspect it for any cracks or damage. If needed, replace the cartridge with a compatible one.
- Tighten Loose Connections: Sometimes, a leaking faucet can be caused by loose connections. Check all the connections, including the handle, spout, and supply lines. Tighten any loose connections using an adjustable wrench or pliers.
- Clean the Aerator: A clogged aerator can also lead to a leaking faucet. Remove the aerator from the spout and clean it thoroughly. Use a toothbrush or a small brush to remove any debris or mineral buildup. Reinstall the aerator and check if the leakage has stopped.
- Test for Leaks: Once you have completed the troubleshooting steps, turn on the water supply and test the faucet for any leaks. If the issue persists, it may be necessary to seek professional help.

Repairing Dripping Pfister Bathroom Faucets
Dealing with a dripping Pfister bathroom faucet can be both annoying and wasteful. However, you can often repair the issue yourself with a few simple steps. Below we provide a DIY guide to repairing a dripping Pfister bathroom faucet.
Gather the Necessary Tools: Before you begin the repair process, gather the necessary tools. This may include an adjustable wrench, screwdriver, replacement parts (such as O-rings or cartridges), and plumber’s tape.
Turn Off the Water Supply: To prevent any water leakage during the repair, turn off the water supply by closing the shut-off valves under the sink.
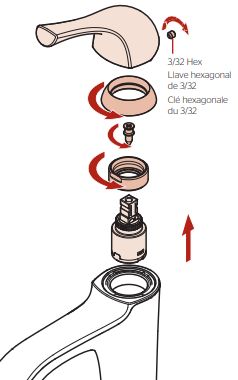
Disassemble the Faucet: Start by removing the handle of the faucet. This may involve unscrewing a decorative cap, handle screw, or using a wrench to loosen the handle. Once the handle is removed, you will have access to the cartridge or stem assembly.
Replace the O-Rings or Cartridge: Inspect the O-rings for any signs of wear or damage. If necessary, replace them with new ones. If the faucet uses a cartridge, remove the old cartridge and replace it with a compatible one. Follow the manufacturer’s instructions for proper installation.
Reassemble and Test the Faucet: Once you have replaced the necessary parts, reassemble the faucet in the reverse order of disassembly. Make sure all connections are tight and secure. Turn on the water supply and test the faucet for any dripping. If the issue persists, you may need to consult a professional plumber.
Regular Maintenance: To prevent future dripping issues, it’s important to perform regular maintenance on your Pfister bathroom faucet. This includes cleaning the aerator, checking for loose connections, and addressing any signs of wear or damage promptly.
Step-by-Step Guide to Fixing Low Water Pressure in Pfister Bathroom Faucets
Experiencing low water pressure in your Pfister bathroom faucet can be frustrating, especially when you need a strong and steady flow. Luckily, there are steps you can take to fix this issue. Follow this step-by-step guide to help you fix low water pressure in Pfister bathroom faucets.
Check the Aerator: Start by checking the aerator, which is located at the end of the faucet spout. Unscrew the aerator and inspect it for any debris or mineral buildup. Clean the aerator thoroughly by soaking it in vinegar or using a brush to remove any clogs. Rinse it with water and reattach it to the faucet.
Clean the Cartridge: Low water pressure can also be caused by a clogged or faulty cartridge. Turn off the water supply and remove the handle and cartridge. Clean the cartridge by soaking it in vinegar or using a cleaning solution specifically designed for cartridges. Rinse it thoroughly and reinstall it.
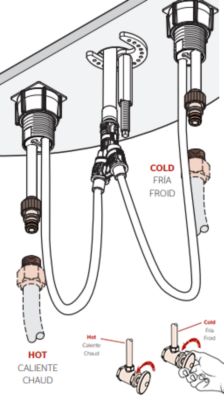
Check the Supply Lines: Inspect the supply lines connected to the faucet for any kinks, bends, or blockages. Straighten any kinks and remove any obstructions that may be affecting the water flow. Ensure that the supply lines are properly connected and tightened.
Adjust the Water Pressure Regulator: If your Pfister bathroom faucet is equipped with a water pressure regulator, it may need to be adjusted. Locate the pressure regulator, which is typically found near the shut-off valves. Use a screwdriver to adjust the regulator to increase the water pressure. Be cautious not to set the pressure too high, as it can damage the faucet or plumbing system.
Check for Plumbing System Issues: If none of the above steps resolve the low water pressure issue, it may be necessary to check for plumbing system issues. Inspect the main water supply line, pressure-reducing valve, or other components of the plumbing system that may be causing the problem. It’s recommended to seek professional assistance for diagnosing and resolving plumbing system issues.
Regular Maintenance: To maintain optimal water pressure in your Pfister bathroom faucet, it’s important to perform regular maintenance. This includes cleaning the aerator, checking the cartridge, inspecting the supply lines, and addressing any plumbing system issues promptly.
Replacing a Faulty Cartridge in a Pfister Bathroom Faucet
A faulty cartridge in a Pfister bathroom faucet can lead to various issues, including leaks, dripping, and erratic temperature control. Replacing the cartridge is often the most effective solution to address these problems. Here is a comprehensive guide to replacing a faulty cartridge in a Pfister bathroom faucet.
Gather the Necessary Tools and Parts: Before you begin, gather the necessary tools and replacement parts. This may include an adjustable wrench, screwdriver, replacement cartridge (specific to your Pfister faucet model), plumber’s tape, and a cloth or towel.
Turn Off the Water Supply: To prevent any water leakage during the replacement process, turn off the water supply by closing the shut-off valves under the sink.
Disassemble the Faucet: Start by removing the handle of the faucet. This may involve unscrewing a decorative cap, handle screw, or using a wrench to loosen the handle. Once the handle is removed, you will have access to the cartridge.
Remove the Old Cartridge: Carefully remove the old cartridge by unscrewing or pulling it out, depending on the type of cartridge used in your Pfister faucet. Take note of the orientation and position of any components for proper reinstallation.
Install the New Cartridge: Insert the new cartridge into the faucet body, aligning it correctly. Follow the manufacturer’s instructions for proper installation. Ensure that any seals or rings provided with the new cartridge are properly positioned.
Reassemble and Test the Faucet: Once the new cartridge is installed, reassemble the faucet in the reverse order of disassembly. Make sure all connections are tight and secure. Turn on the water supply and test the faucet for any leaks or issues with temperature control.
Regular Maintenance: To prolong the lifespan of the new cartridge and ensure optimal performance, it’s important to perform regular maintenance on your Pfister bathroom faucet. This includes cleaning the aerator, checking for leaks or dripping, and addressing any signs of wear or damage promptly.
Bathroom – Faucet is Leaking or Dripping
Price Pfister Bathroom Sink Faucet Repair
Repairing a Leaking Price Pfister Shower Faucet (replacing/tuning
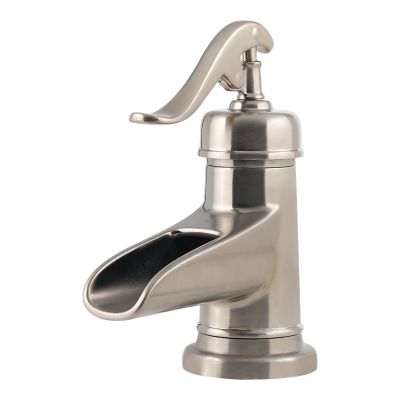
Brushed Nickel Ashfield LF-M42-YPKK Single Control Bathroom Faucet
Price Pfister Bathroom Faucet Leaking Handle Cartridge Repair
SENLO Price Pfister Faucets Bathtub and Bathroom Shower 3-Chrome-Handle Remodel Rebuild Repair Replacement Tub Trim Kit Compression Valve Stem Verve
Complete Faucet Rebuild Trim Kit for Price Pfister Faucets
Polished Chrome Sonterra LF-WL2-45PC 2-Handle 4″ Centerset
Related Posts:
- Long Spout Bathroom Faucet
- Smart Bathroom Faucets
- Delta Classic Chrome Bathroom Faucet
- Art Deco Bathroom Faucets
- Bathroom Faucet With Diverter
- How To Remove Aerator From Bathroom Faucet
- Replace Aerator Bathroom Faucet
- Moen Darcy Bathroom Faucet
- Pfister Classic Bathroom Faucet
- How To Install A Single Handle Bathroom Faucet
