Introduction to P-Trap Installation for Bathroom Sinks
Installing a P-trap for your bathroom sink is essential to your plumbing system, as it prevents sewer gases from entering your home while allowing wastewater to flow freely. Understanding the basics of P-trap installation is crucial for maintaining the functionality and efficiency of your plumbing system.
- Purpose of a P-Trap: A P-trap is a curved pipe typically installed beneath the sink that forms a water seal, preventing odors and gases from rising up through the drain and into your home. It also helps trap debris and prevent clogs in your plumbing system, ensuring smooth drainage and optimal performance.
- Importance of Proper Installation: Proper installation of a P-trap is essential for ensuring its effectiveness and preventing potential issues such as leaks, odors, and drainage problems. Whether you’re replacing an existing P-trap or installing a new one, following the correct installation procedures is crucial for maintaining the integrity of your plumbing system.
- DIY vs. Professional Installation: While installing a P-trap can be a relatively straightforward task for experienced DIYers, it may require professional assistance for those less familiar with plumbing systems. Hiring a licensed plumber ensures that the installation is done correctly and according to local building codes, minimizing the risk of future problems.

Tools and Materials Needed for Installing a P-Trap
Before you begin installing a P-trap for your bathroom sink, gathering all the necessary tools and materials is essential to ensure a smooth and efficient installation process. Having the right equipment on hand will help you complete the job effectively and minimize the risk of errors or delays.
Tools Needed:
-
- Adjustable wrench
- Pipe wrench
- Plumber’s tape
- Hacksaw or PVC pipe cutter
- Screwdriver
- A bucket or basin for catching water
Materials Needed:
-
- P-trap kit (includes P-trap, trap arm, nuts, and washers)
- PVC pipe (if replacing existing pipes)
- Plumber’s putty or silicone caulk (for sealing connections)
- Pipe fittings (if necessary for connecting to existing plumbing)
- Safety goggles and gloves (optional but recommended)
Safety Precautions: Before beginning any plumbing project, it’s essential to prioritize safety. Wear safety goggles and gloves to protect your eyes and hands from potential hazards, and use caution when working with sharp tools or heavy materials. Additionally, turn off the water supply to the sink before starting the installation to prevent leaks or water damage.
Step-by-Step Guide to Installing a P-Trap for Your Bathroom Sink
Installing a P-trap for your bathroom sink is a straightforward process that can be completed in just a few simple steps. Follow this step-by-step guide to ensure a successful installation and maintain the functionality of your plumbing system.
Turn off the Water: Before beginning the installation, shut off the water supply to the sink by turning the shut-off valves located beneath the sink clockwise until they are fully closed. If there are no shut-off valves, you may need to shut off the main water supply to your home.
Remove the Existing P-Trap (if applicable): If you’re replacing an existing P-trap, use an adjustable wrench to loosen the nuts securing the trap to the drainpipe and the tailpiece of the sink. Place a bucket or basin beneath the trap to catch any water or debris that may spill out during removal.
Prepare the New P-Trap: If you’re installing a new P-trap, assemble the components of the trap according to the manufacturer’s instructions. Apply plumber’s tape to the threads of the trap arm and the tailpiece to ensure a watertight seal.
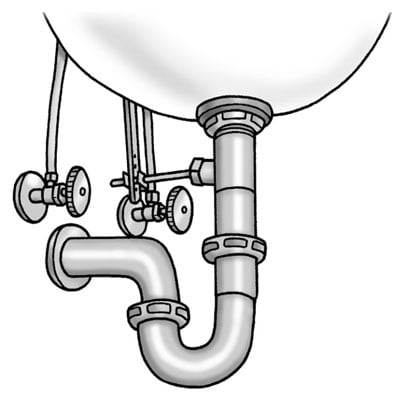
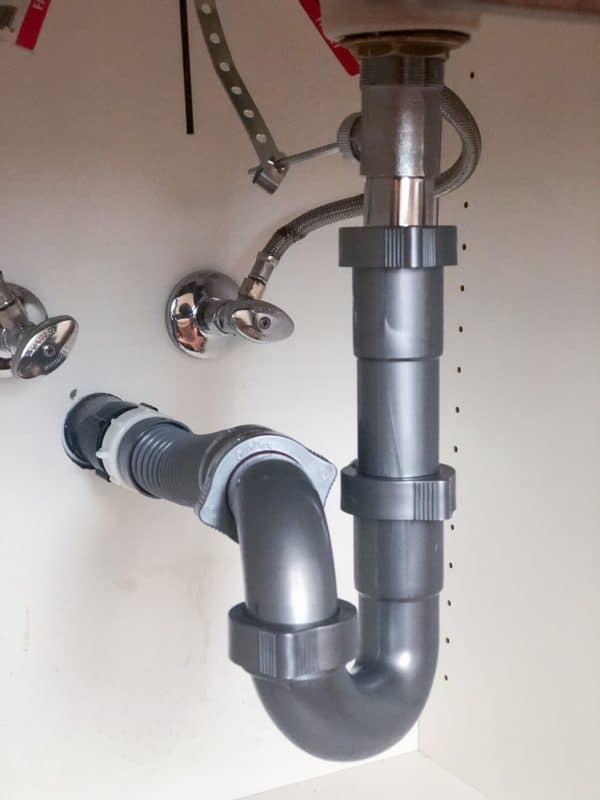
Connect the P-Trap to the Drainpipe: Slide the slip nut and washer onto the end of the trap arm, then insert the arm into the drainpipe beneath the sink. Tighten the slip nut securely with an adjustable wrench to create a watertight seal.
Connect the P-Trap to the Tailpiece: Slide the slip nut and washer onto the end of the tailpiece, then insert the tailpiece into the open end of the P-trap. Tighten the slip nut securely with an adjustable wrench to create a watertight seal.
Check for Leaks: Once the P-trap is securely installed, turn on the water supply to the sink and check for any leaks around the connections. If you notice any leaks, tighten the slip nuts further or apply plumber’s putty or silicone caulk to create a tighter seal.
Tips for Ensuring Proper Installation and Functionality
Ensuring proper installation and functionality of your P-trap is essential for maintaining the integrity of your plumbing system and preventing potential issues such as leaks or drainage problems. Follow these tips to ensure a successful P-trap installation and optimize the performance of your bathroom sink.
Choose the Right Size: When selecting a P-trap for your bathroom sink, ensure that it is the correct size and configuration to fit your plumbing setup. Measure the diameter of your drainpipe and tailpiece to ensure a proper fit, and choose a P-trap that matches these dimensions.
Use Plumber’s Tape: Apply plumber’s tape to the threads of the trap arm and tailpiece before assembling the P-trap. This helps create a watertight seal and prevents leaks from occurring at the connections.
Tighten Connections Securely: Use an adjustable wrench to tighten the slip nuts securely at each connection point. Avoid over-tightening, as this can damage the fittings or strip the threads. Check for leaks after tightening to ensure a proper seal.
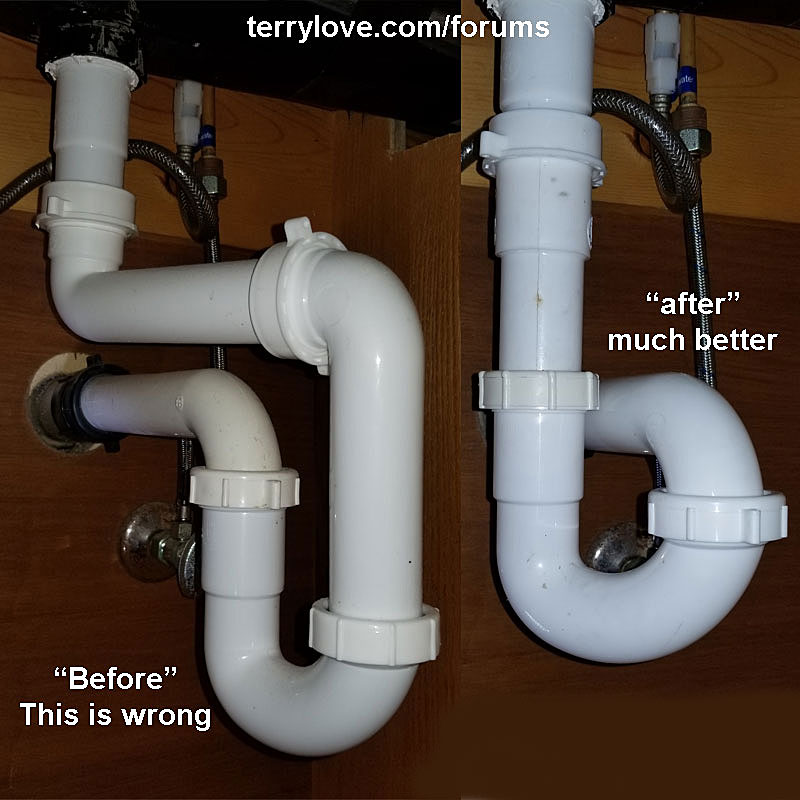
Check for Alignment: Ensure that the P-trap is properly aligned with the drainpipe and tailpiece before tightening the connections. Misalignment can cause leaks or drainage problems, so take the time to adjust the position of the trap as needed.
Inspect for Damage: Before installing the P-trap, inspect all components for any signs of damage or defects. Cracks, dents, or deformities can compromise the integrity of the trap and lead to leaks or other issues. If you notice any damage, replace the affected components before proceeding with the installation.
Consider Professional Assistance: If you’re unsure how to install a P-trap or encounter any difficulties during the installation process, don’t hesitate to seek professional assistance from a licensed plumber. A professional can ensure that the P-trap is installed correctly and according to local building codes, minimizing the risk of future problems.
Troubleshooting Common Issues with P-Trap Installation
While installing a P-trap for your bathroom sink is generally a straightforward process, you may encounter some common issues along the way. Knowing how to troubleshoot these issues can help you address them quickly and effectively, ensuring a successful installation and optimal functionality of your plumbing system.
Leaking Connections: If you notice leaks around the connections of your P-trap, it may be due to loose or improperly tightened slip nuts. Use an adjustable wrench to tighten the slip nuts securely, taking care not to over-tighten. If the leaks persist, apply the plumber’s putty or silicone caulk to create a tighter seal.
Misalignment: Misalignment of the P-trap with the drainpipe or tailpiece can lead to leaks or drainage problems. Ensure that the P-trap is properly aligned before tightening the connections, and adjust the position of the trap as needed to achieve a proper fit.
Clogs or Blockages: If your sink is draining slowly or not draining at all, it may be due to a clog or blockage in the P-trap or drainpipe. Use a plunger or plumbing snake to remove any obstructions from the drain, and check the P-trap for debris or buildup that may be causing the blockage.
Odors or Sewer Gas Smells: If you notice foul odors or sewer gas smells coming from your sink, it may be due to a dry P-trap or inadequate water seal. Run water through the sink to refill the P-trap and create a proper water seal, which should eliminate the odors.
Cracked or Damaged Components: Inspect all components of the P-trap for any signs of damage or defects, such as cracks, dents, or deformities. Damaged components can compromise the integrity of the trap and lead to leaks or other issues. If you notice any damage, replace the affected components before proceeding with the installation.
Professional Assistance: If you’re unable to resolve any issues with your P-trap installation on your own, or if you encounter more serious problems such as major leaks or damage to your plumbing system, it’s best to seek professional assistance from a licensed plumber. A professional can assess the situation, identify the underlying issues, and recommend appropriate solutions to resolve the problem.
Common Mistakes to Avoid
Avoiding common mistakes during P-trap installation is essential for ensuring the integrity and functionality of your plumbing system. By being aware of these potential pitfalls, you can minimize the risk of leaks, odors, and drainage issues. Here are some common mistakes to avoid when installing a P-trap for your bathroom sink:
Using the Wrong Size or Type of P-Trap: Using a P-trap that is the wrong size or type for your plumbing setup can lead to improper fitment and potential leaks. Ensure that you select a P-trap that matches the diameter of your drainpipe and tailpiece, and choose the appropriate configuration for your specific installation requirements.
Improper Alignment: Failing to properly align the P-trap with the drainpipe and tailpiece can result in leaks or drainage problems. Ensure that the trap arm is positioned at the correct angle and height to achieve a smooth flow of wastewater through the system.
Over-Tightening Connections: Over-tightening the slip nuts or fittings on the P-trap can damage the threads or cause cracks in the components, leading to leaks. Tighten the connections securely, but avoid applying excessive force that could compromise the integrity of the fittings.
Underestimating the Importance of Sealing: Neglecting to properly seal the connections between the P-trap and the drainpipe and tailpiece can result in leaks and odors. Use plumber’s tape on the threads of the trap arm and tailpiece, and consider applying plumber’s putty or silicone caulk to create a watertight seal.
Skipping Inspection for Damage: Failing to inspect the P-trap components for damage or defects before installation can result in issues down the line. Check for cracks, dents, or deformities in the fittings, and replace any damaged components before proceeding with the installation.
Ignoring Local Building Codes: Neglecting to adhere to local building codes and regulations during P-trap installation can result in compliance issues and potential safety hazards. Familiarize yourself with the applicable codes and ensure that your installation meets all requirements.
Not Testing for Leaks: Failing to test the P-trap for leaks after installation can result in unnoticed issues that could lead to water damage or mold growth. Run water through the sink and check for any signs of leaks around the connections. If you notice any leaks, tighten the connections or reseal them as needed.
Lack of Maintenance: Once the P-trap is installed, it’s important to perform regular maintenance to ensure its continued functionality. Keep the trap clean and free of debris, and address any issues promptly to prevent potential problems from worsening over time.
How to Install the P-Trap under a Sink Article – dummies
P-traps-installing them properly – Charles Buell Inspections Inc.
How to Replace a Sink Trap Plumbing The Home Depot
Bathroom Sink Plumbing Installation DIY Montreal
SIMPLE DRAIN 1.25 in. Rubber Threaded P-Trap Bathroom Single Sink
Bathroom Sink Drains
Related Posts:
- Clearing Slow Draining Bathroom Sink
- Bathroom Sink Counter Depth
- How To Fix A Leaky Bathroom Sink Drain Pipe
- Bathroom Sink Refinishing Kit
- Copper Trough Bathroom Sink
- How To Clean Bathroom Sink With Vinegar
- Best Bathroom Sink Brands
- Best Way To Clear Slow Bathroom Sink Drain
- Master Bathroom Sink Ideas
- Bathroom Sink Countertop Combination


