The Role of a P-Trap in Your Bathroom Sink
The P-trap is an essential component of any bathroom sink, yet it often goes unnoticed until something goes wrong. Understanding the role of a P-trap can help you appreciate its importance and ensure it functions properly.
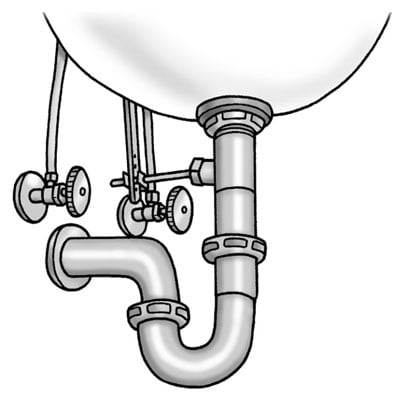
- Preventing Sewer Gas: One of the primary functions of a P-trap is to prevent sewer gases from entering your home. The P-trap holds a small amount of water in its curved section, creating a barrier that blocks gases from the sewer system. This water seal is crucial for maintaining a healthy and odor-free environment in your bathroom.
- Trapping Debris: The P-trap also serves as a catchment area for debris that may go down the drain. Hair, soap scum, and other small items can accumulate in the trap, preventing them from clogging the main drain line. This helps to keep your plumbing system running smoothly and reduces the need for frequent drain cleaning.
- Providing Easy Access for Cleaning: Because the P-trap collects debris, it can become clogged over time. Fortunately, it is designed to be easily accessible for cleaning. Most P-traps have a removable section that can be unscrewed to clear blockages. This makes maintenance relatively straightforward, even for those with limited plumbing experience.
- Aiding in Leak Detection: The P-trap’s location and design also make it useful for leak detection. Since it is positioned under the sink, it is easy to check for leaks during regular maintenance. Any signs of water around the P-trap indicate a potential issue that needs to be addressed promptly to prevent water damage.
- Supporting Efficient Drainage: A properly installed P-trap ensures efficient drainage from your sink. It helps maintain the correct pressure balance in the plumbing system, allowing water to flow smoothly and preventing slow drains. If the P-trap is not functioning correctly, you may notice gurgling sounds or slow drainage, indicating a need for inspection or replacement.
- Compliance with Plumbing Codes: Lastly, the installation of a P-trap is mandated by plumbing codes in most areas. These codes are in place to ensure the safety and functionality of plumbing systems. By installing and maintaining a P-trap, you are not only complying with regulations but also ensuring the overall health and safety of your home.

Tools and Materials Needed for P-Trap Installation
Installing a P-trap for your bathroom sink requires the right tools and materials to ensure a successful and leak-free setup. Here’s a comprehensive list of what you’ll need and why each item is important.
P-Trap Kit
The most crucial component is the P-trap kit itself. These kits typically include the curved trap, a straight pipe, and various fittings. Make sure to choose a kit that matches the size and type of your existing plumbing (usually 1-1/4 or 1-1/2 inches in diameter).
Pipe Wrench or Adjustable Wrench
A pipe wrench or an adjustable wrench is essential for loosening and tightening the connections on the old and new P-trap. The adjustable wrench is particularly useful because it can be sized to fit different nuts and bolts, providing a secure grip.
Plumber’s Putty
Plumber’s putty is used to create a watertight seal around the sink drain. It is pliable and easy to work with, making it ideal for sealing joints and preventing leaks. Ensure you have enough putty to form a continuous bead around the drain flange.
Teflon Tape
Teflon tape, also known as plumber’s tape, is used to seal threaded pipe connections. Wrapping the tape around the threads of the pipe ensures a tight fit and helps prevent leaks. It’s a simple yet effective way to secure connections without the need for additional sealants.
Bucket or Pan
A bucket or pan is essential to catch any water that may spill when you remove the old P-trap. Even if you have shut off the water supply, there will still be some residual water in the pipes. Having a bucket handy helps keep your workspace clean and dry.
Cleaning Supplies
Before installing the new P-trap, you’ll need to clean the area around the sink drain and pipes. A rag, sponge, and some cleaning solution will help remove any debris, old plumber’s putty, or residue that could interfere with the new installation. A clean surface ensures a better seal and fit for the new components.
Hacksaw
In some cases, you may need to cut the new pipes to fit the existing plumbing. A hacksaw is useful for making precise cuts in PVC or metal pipes. Ensure the blade is sharp and suitable for the material you are cutting.
Step-by-Step Guide to Removing the Old P-Trap
Removing the old P-trap is the first step in installing a new one. This process can seem daunting, but with the right approach, it can be straightforward and manageable. Here’s a detailed guide to help you through it.
Gather Your Tools and Materials
Before you begin, ensure you have all the necessary tools and materials. This includes an adjustable wrench, a bucket or pan, and cleaning supplies. Having everything within reach will make the process smoother and quicker.
Turn Off the Water Supply
Although you’re not working directly with the water supply, it’s a good practice to turn off the water valves under the sink. This precaution prevents any accidental water flow while you’re working on the plumbing. Turn the valves clockwise to shut them off.
Place a Bucket Under the P-Trap
Position a bucket or pan directly under the P-trap to catch any water that spills when you remove it. Even with the water supply turned off, there will still be water trapped in the P-trap and pipes. This step helps keep your workspace dry and prevents messes.
Loosen the Slip Nuts
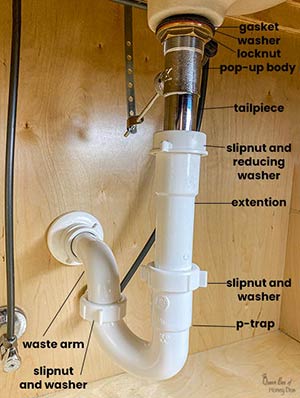
Using an adjustable wrench, loosen the slip nuts on either end of the P-trap. There are typically two slip nuts: one connecting the trap to the sink drain pipe and the other connecting it to the wall drain pipe. Turn the nuts counterclockwise until they are loose enough to remove by hand.
Remove the P-Trap
Once the slip nuts are loose, carefully remove the P-trap. Tilt it gently to pour any remaining water into the bucket. Be mindful of any debris that may have accumulated in the trap. Set the old P-trap aside, and inspect the connecting pipes for any signs of damage or wear.
Clean the Connection Points
Before installing the new P-trap, clean the connection points on the sink drain and wall drain pipes. Use a rag or sponge to wipe away any residue, old plumber’s putty, or debris. Ensuring the connection points are clean helps create a better seal for the new installation.
Installing the New P-Trap: A Detailed Walkthrough
Installing a new P-trap is a critical step in ensuring your bathroom sink functions properly. With the old P-trap removed, follow this detailed walkthrough to install the new one effectively.
Prepare the New P-Trap
Begin by assembling the new P-trap. Most P-trap kits come with all the necessary components, including the curved trap, straight pipe, and slip nuts. Dry-fit the pieces together to ensure they align correctly with your existing plumbing. This step helps you identify any adjustments needed before final installation.
Apply Teflon Tape
Wrap Teflon tape around the threaded ends of the pipes where the connections will be made. This tape helps create a watertight seal and prevents leaks. Wrap the tape in a clockwise direction to match the tightening direction of the slip nuts. Ensure the tape covers the threads evenly without overlapping too much.
Attach the P-Trap to the Sink Drain
Position the curved section of the P-trap under the sink drain pipe. Slide a slip nut and washer over the end of the sink drain pipe, followed by the trap. Hand-tighten the slip nut onto the trap, ensuring it is secure but not overly tight. This connection forms the upper part of the P-trap assembly.
Connect the P-Trap to the Wall Drain
Next, align the straight pipe section of the P-trap with the wall drain pipe. Slide another slip nut and washer over the end of the wall drain pipe, then attach the straight pipe. Hand-tighten the slip nut onto the wall drain connection. Ensure both connections are aligned properly and the trap maintains its P-shape.
Tighten the Slip Nuts
Once both connections are in place and hand-tightened, use an adjustable wrench to gently tighten the slip nuts further. Be cautious not to overtighten, as this can crack the pipes or damage the threads. Tighten just enough to create a secure, leak-free connection.
Test for Leaks
With the new P-trap installed, it’s essential to test for leaks to ensure everything is properly sealed. Turn on the water supply and let the water run for a few moments. Check for any signs of water dripping or pooling around the connections. If you notice any leaks, tighten the slip nuts slightly until the leaks stop. If tightening the nuts doesn’t resolve the issue, you may need to disassemble the connections and reapply plumber’s putty or Teflon tape before reassembling.
Adjust the Alignment
Before completing the installation, double-check the alignment of the P-trap and ensure it maintains its proper shape. The trap should form a gentle curve without any kinks or twists in the pipes. Adjust the positioning as needed to achieve the correct alignment.
Secure the Pipes
Once you’re satisfied with the alignment and there are no leaks, secure the pipes in their final position. Use pipe clamps or straps to support the P-trap and prevent it from shifting or sagging over time. Proper support helps maintain the integrity of the connections and prevents stress on the pipes.
Clean Up
After the installation is complete and you’ve confirmed there are no leaks, clean up any debris or excess plumber’s putty from around the sink drain and pipes. Wipe down the area with a damp cloth to remove any residue and ensure a tidy finish. Dispose of any old P-trap components properly.
Perform a Final Check
Once the installation is finished and everything is cleaned up, perform a final check to ensure everything is in working order. Run water through the sink drain and observe the flow to ensure it drains smoothly without any backups or gurgling noises. Check for any signs of leaks or loose connections.
Common Mistakes to Avoid When Installing a P-Trap
While installing a P-trap for your bathroom sink may seem like a simple task, several common mistakes can lead to leaks, clogs, and other plumbing issues. Avoiding these mistakes will help ensure a successful installation and prevent future problems.
Incorrect Sizing
One of the most common mistakes is using the wrong size P-trap for your plumbing setup. P-traps come in different diameters to fit various drain pipes, so it’s essential to choose the correct size for your sink. Using a P-trap that is too large or too small can result in leaks and improper drainage.
Over-tightening Connections
Another common mistake is over-tightening the slip nuts that secure the P-trap to the drain pipes. While it’s important to ensure a tight seal, excessive force can damage the threads or crack the pipes. Tighten the slip nuts securely but avoid using too much force.
Improper Alignment
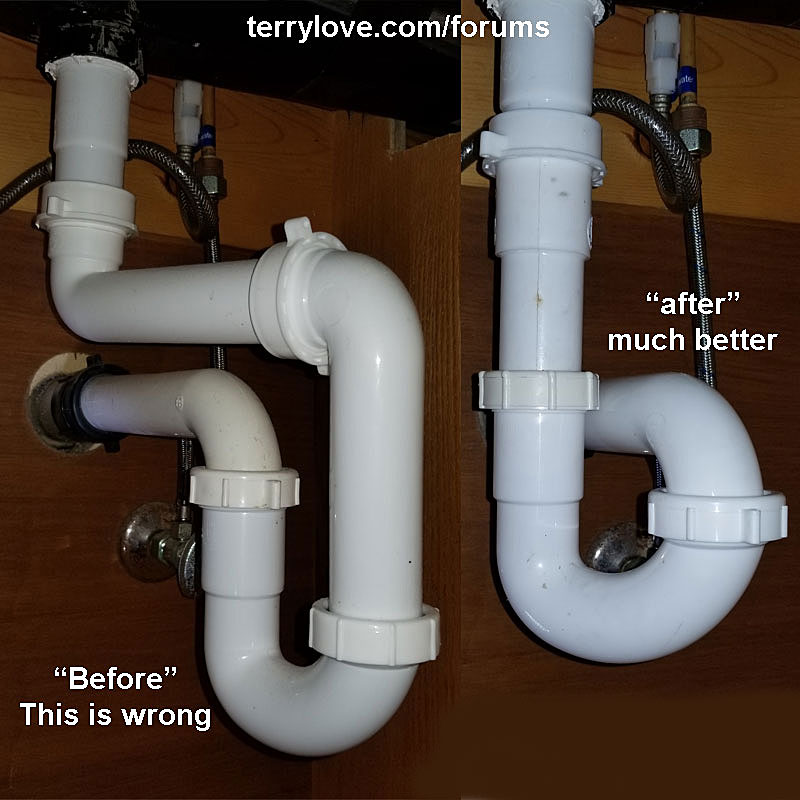
Proper alignment of the P-trap is crucial for effective drainage and preventing leaks. Ensure the trap maintains its P-shape and that the pipes are not kinked or twisted. Misalignment can lead to slow drains, backups, and leaks.
Forgetting to Use Plumber’s Putty or Teflon Tape
Plumber’s putty or Teflon tape is essential for creating a watertight seal around threaded connections. Forgetting to use these materials or applying them incorrectly can result in leaks. Always apply plumber’s putty or Teflon tape to threaded connections to prevent water from seeping out.
Neglecting to Test for Leaks
After installing the new P-trap, it’s crucial to test for leaks before considering the job complete. Neglecting this step can result in water damage and other costly repairs down the line. Run water through the sink drain and check for any signs of leaks around the connections.
Failing to Provide Adequate Support
P-traps should be properly supported to prevent sagging or shifting over time. Failing to provide adequate support can put stress on the connections and lead to leaks. Use pipe clamps or straps to secure the P-trap in place and prevent movement.
Maintenance Tips for Ensuring Your P-Trap Works Efficiently
Once your P-trap is installed, it’s essential to perform regular maintenance to ensure it continues to function efficiently and prevent issues like clogs and leaks. Here are some maintenance tips to help keep your P-trap in top condition.
Clean the P-Trap Regularly
Regular cleaning is crucial for preventing clogs and maintaining proper drainage. Remove the P-trap periodically and clean out any debris, hair, and soap scum that may have accumulated inside. Use a brush or a pipe cleaner to dislodge stubborn buildup.
Check for Leaks
Regularly inspect the connections on your P-trap for any signs of leaks. Look for water stains, drips, or pooling around the connections. If you notice any leaks, tighten the slip nuts or replace any damaged components immediately to prevent water damage.
Use Drain Strainers
To prevent debris from entering the P-trap and causing clogs, use drain strainers or stoppers in your sink drains. These inexpensive devices catch hair, food particles, and other debris before they can go down the drain and accumulate in the trap.
Avoid Pouring Grease Down the Drain
Grease and oil can solidify in the P-trap and cause clogs over time. Avoid pouring grease, oil, or fat down the sink drain to prevent buildup and maintain proper drainage. Instead, dispose of these substances in the trash or recycle them if possible.
Flush the Drain with Hot Water
Regularly flushing your sink drain with hot water can help prevent clogs and keep the P-trap clear of debris. Once a week, pour a kettle of boiling water down the drain to flush away any buildup and keep the pipes clean.
Address Plumbing Issues Promptly
If you notice any signs of plumbing problems, such as slow drains, foul odors, or unusual noises, address them promptly. Ignoring these issues can lead to more significant problems down the line, such as clogs, leaks, or damage to the pipes. Contact a plumber if you’re unsure how to address the problem yourself.
Insulate Exposed Pipes in Cold Weather
In cold climates, exposed pipes can freeze and crack, leading to leaks or bursts in the P-trap. Insulate any exposed pipes under the sink to protect them from freezing temperatures. Use pipe insulation or heat tape to wrap the pipes and prevent heat loss.
Schedule Regular Plumbing Inspections
To ensure your plumbing system is in good condition, schedule regular inspections with a qualified plumber. A professional inspection can identify any potential issues with your P-trap or other plumbing components and address them before they become major problems.
Consider Installing a Water Softener
If you live in an area with hard water, mineral buildup can occur in your plumbing system, including the P-trap. Consider installing a water softener to reduce mineral deposits and extend the life of your plumbing fixtures and appliances.
Replace Old or Damaged P-Traps
Over time, P-traps can become worn or damaged, leading to leaks or inefficiencies. If you notice any signs of deterioration, such as rust, corrosion, or warping, replace the P-trap with a new one. This will ensure proper drainage and prevent water damage to your home.
The wrong way to install a lav p-trap on a bathroom sink. Terry
How to Install the P-Trap under a Sink Article – dummies
How to Replace a Sink Trap Plumbing The Home Depot
How to Install a Bathroom Sink Drain
Pin on Bathroom remodeling
Bathroom Sink Drains
Related Posts:
- Bathroom Sink Water Faucets
- Bathroom Sink Overflow Cap
- Drop In White Bathroom Sink
- Discount Bathroom Sinks And Toilets
- How To Replace Your Bathroom Sink
- How To Naturally Unclog A Bathroom Sink
- How Do You Clean A Bathroom Sink Drain
- Art Glass Bathroom Sinks
- Best Way To Unblock Bathroom Sink
- 18 Inch Wall Mount Bathroom Sink


